The Postage Stamp Quilt Square Swap has begun!

PSQ Swap badgedates

Sign ups to the first ever Jess Made This Postage Stamp Quilt Square Swap have officially closed. All swappers should now have received an email letting them know who they will be swapping with.

Your job now is to get in touch with all your partners and to post off your bundles of squares by the 10th of March. 

If you have any problems getting in touch with any of your partners, give them a day or so to respond before getting in touch with me. Sometimes life happens and the swap is the last thing on our minds. Being mindful of that can make it less frustrating when communication mishaps happen. But if you can’t solve it yourself, send me an email and I’ll find a solution to suit everyone.

I think this has shaped up to be a good little swap and we have lots of people involved from different countries so the fabric variety should be impressive. If anyone would like to take a photo of the squares they receive and send it to me, I’ll make up a fun post showing all the squares sent out and the stats involved in the swap.

But that’s enough for now, I’ve got to get onto emailing all my swap partners! If you’ve got any questions about the swap or if you’re having trouble reaching a partner, feel free to use the comments section below as a message board.

Happy Swapping everyone!

DIY Upcycled Bookmarks


This week I had an absolute blast making a bunch of bookmarks from scrap paper and a really old melways I discovered hiding in my car when it was written off earlier this year. I hunted around online for some inspiration and in the end made 3 different types of bookmarks:

– one from a spine label of a book

– one using text from The Hunger Games

– 0ne using the Melways paired with a favourite quote of mine.

I’ve made some quick tutorials for anyone else wanting to make the same. For the bookmark template, just google around online until you find one that you like. These bookmarks are all pretty basic so changing the template won’t ruin it.

JMT Hunger Games Bookmark Instructions JMT Spine Label Bookmark Instructions JMT Favourite Quote Bookmark Instructions

After making the above three I admittedly did get a bit carried away and made a few more quote bookmarks. I think they look pretty cool though:

IMG_2796


Have you made any awesome DIY bookmarks from old paper or old books? I’d love to hear about it if you have, leave me a message in the comments section.

Wonky Houses

This week I had a go at a Wonky House Block for a Facebook Group Swap that I signed up for. I had so much fun making it that I’m looking forward to making many more.

There isn’t a set pattern used to make one of these – it’s more a sew-and-make-it-up-as-you-go type projects. Using the basic guidelines over at The Sewing Chick it turned out to be a lot easier than it looked – and a lot of fun! I won’t reinvent the wheel by churning out her instructions again, just click here to have a read.

IMG_2721


As you can see, it also created a lot of mess! But it also turned out pretty cool. My obsessive need for order and straight lines made it pretty hard to deliberately make it wonky but I’m hoping to have more of that in the next one I make.

Wonky House Swap 2015 3

I’m thinking a whole quilt made out of these would be pretty cool – has anyone else made one before? Also, if anyone would like to join the swap, sign ups are open until Feb 15!

Duct Tape Wallet DIY

This week I had a go at a project I’ve been eyeing off for almost two years – the duct tape wallet. Despite having an abundance of duct tape at my house, I haven’t attempted this until now. I really wish I’d given it a go earlier instead of passing it off as being too hard because it was ridiculously easy. It only took me 20 minutes to turn a bit of duct tape into a useable wallet. As far as last-minute, inexpensive Christmas gift ideas go, this is a winner. There are heaps of tutorials for different styles on the internet, but this one is by far the easiest one I found.

So without further ado, here is how to make one for yourself:

Step one: Cut four strips of duct tape approximately 10 inches long. With the adhesive side up, adhere the duct-tape strips one to another with a 1/4″ overlap.

IMG_2407  step1


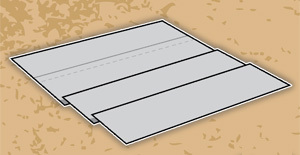
You now have a sheet of duct tape that is roughly 10 inches by about 7 inches. Don’t stress too much about the size at this point because we will trim it down later. Make a second sheet.

Step two: Very carefully adhere the two sheets with sticky sides together. I used a ruler to smooth out the bubbles as I went, but whatever method you come up with will be ok. Once adhered together, rub over to smooth out any bubbles.

IMG_2409


Step three: Cut a 10 inch strip of duct tape. Use a utility knife or scissors to cut the strip down the middle into 2 strips that are 1inch wide and 10 inches long. This can be super fiddly as the tape kept getting stuck to my scissors, so take your time! If you can’t get the strips exactly straight, don’t stress. This is a DIY project after all!

Fold the 1 inch duct-tape strips over the edges of the 10 inch ends of the sheet. This will make a smooth, clean finished edge.

IMG_2411  step4


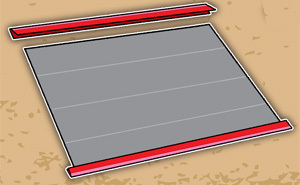
Step four: Using scissors or a rotary cutter, trim the jagged edges off to leave a sheet of tape that is 9 inches wide.

IMG_2413


Step five: Fold the sheet in half so that the 10 inch sides are touching. Cut two 1inch x 4inch duct tape strips using the process in Step 3. Fold and stick the ends of the duct-tape wallet together using these 1inch strips. Trim off any excess.

IMG_2415


Step six: Technically you can stop here and you have a functioning notes wallet. But if you’re keen to add a pocket for bank cards etc, read on. Cut two strips of tape 5 inches long and stick the two pieces together with sticky sides in the middle.

Like in steps three and five, stick a 1″ strip onto one of the 5″ edges to make it nice and neat. Trim the pocket to 4″ long.

IMG_2414  IMG_2416


Step seven: Using 1/2 inch strips of duct tape, stick the pocket in place as shown on the diagram below. Trim the strips flush… and you’re done!

step10IMG_2418


IMG_2419