DIY Upcycled Bookmarks


This week I had an absolute blast making a bunch of bookmarks from scrap paper and a really old melways I discovered hiding in my car when it was written off earlier this year. I hunted around online for some inspiration and in the end made 3 different types of bookmarks:

– one from a spine label of a book

– one using text from The Hunger Games

– 0ne using the Melways paired with a favourite quote of mine.

I’ve made some quick tutorials for anyone else wanting to make the same. For the bookmark template, just google around online until you find one that you like. These bookmarks are all pretty basic so changing the template won’t ruin it.

JMT Hunger Games Bookmark Instructions JMT Spine Label Bookmark Instructions JMT Favourite Quote Bookmark Instructions

After making the above three I admittedly did get a bit carried away and made a few more quote bookmarks. I think they look pretty cool though:

IMG_2796


Have you made any awesome DIY bookmarks from old paper or old books? I’d love to hear about it if you have, leave me a message in the comments section.

Duct Tape Wallet DIY

This week I had a go at a project I’ve been eyeing off for almost two years – the duct tape wallet. Despite having an abundance of duct tape at my house, I haven’t attempted this until now. I really wish I’d given it a go earlier instead of passing it off as being too hard because it was ridiculously easy. It only took me 20 minutes to turn a bit of duct tape into a useable wallet. As far as last-minute, inexpensive Christmas gift ideas go, this is a winner. There are heaps of tutorials for different styles on the internet, but this one is by far the easiest one I found.

So without further ado, here is how to make one for yourself:

Step one: Cut four strips of duct tape approximately 10 inches long. With the adhesive side up, adhere the duct-tape strips one to another with a 1/4″ overlap.

IMG_2407  step1


You now have a sheet of duct tape that is roughly 10 inches by about 7 inches. Don’t stress too much about the size at this point because we will trim it down later. Make a second sheet.

Step two: Very carefully adhere the two sheets with sticky sides together. I used a ruler to smooth out the bubbles as I went, but whatever method you come up with will be ok. Once adhered together, rub over to smooth out any bubbles.

IMG_2409


Step three: Cut a 10 inch strip of duct tape. Use a utility knife or scissors to cut the strip down the middle into 2 strips that are 1inch wide and 10 inches long. This can be super fiddly as the tape kept getting stuck to my scissors, so take your time! If you can’t get the strips exactly straight, don’t stress. This is a DIY project after all!

Fold the 1 inch duct-tape strips over the edges of the 10 inch ends of the sheet. This will make a smooth, clean finished edge.

IMG_2411  step4


Step four: Using scissors or a rotary cutter, trim the jagged edges off to leave a sheet of tape that is 9 inches wide.

IMG_2413


Step five: Fold the sheet in half so that the 10 inch sides are touching. Cut two 1inch x 4inch duct tape strips using the process in Step 3. Fold and stick the ends of the duct-tape wallet together using these 1inch strips. Trim off any excess.

IMG_2415


Step six: Technically you can stop here and you have a functioning notes wallet. But if you’re keen to add a pocket for bank cards etc, read on. Cut two strips of tape 5 inches long and stick the two pieces together with sticky sides in the middle.

Like in steps three and five, stick a 1″ strip onto one of the 5″ edges to make it nice and neat. Trim the pocket to 4″ long.

IMG_2414  IMG_2416


Step seven: Using 1/2 inch strips of duct tape, stick the pocket in place as shown on the diagram below. Trim the strips flush… and you’re done!

step10IMG_2418


IMG_2419


Milo Tin Makeover

So it may be early to be preparing for Christmas but here I am, as usual, getting prepared. This year I wanted to give something a bit more meaningful that store-purchased gifts and I also wanted to see how well I could upcycle the Milo and/or Pringle tins I’ve been saving all year. I had a killer recipe for Chocolate Balls – delicious cool treats that are always well received, so I figured I would fill a Pringles tin with them and wrap the tin in a special, fun way. Unfortunately after washing the Pringles tins I realised that they still had a very distinct smell of Pringles. Mixed with Chocolate Balls, the result wasn’t going to be pretty. But after washing the Milo Tins and finding them to be odourless – I decided to ditch the Pringles idea and run with the Milo tins instead. The idea was a winner!

First up, I gathered my supplies.

IMG_2314

– Milo Tin(s)

– Old but clean paintbrush

– Decorative card to recover the tin with

– Paper cutter, pen & scissors (ruler will do if you don’t have a guillotine)

– Mod Podge (found at your local craft store)

Step two:

IMG_2311

Cut your paper down to size. I roughly measured the heigh of the Milo Tin by laying it on top of the paper and making a mark. But you can use a ruler if you like. I also opted to leave the original Milo label on the tin as this particular one was corrugated and I figured the paper would adhere better to that. But if you’re taking your label off, then now is the perfect time. If you want to put something on the lid of the tin, trace a circle onto your cardstock and cut out. Set this aside for later. Once your main piece of paper is cut to size you need to cover the sides of the tin in Mod Podge and adhere the paper to it.

Step three:

IMG_2318IMG_2316

Before commencing decoration of the Tin I pre-printed a bunch of circles that included my recipe, ingredients and what I wanted on the lid of the tin.  Anything you want to stick on the tin should be put on there before covering the outside in Mod Podge. However if you do print something you’ll want to give it 24 hours to completely dry – the Mod Podge will make the ink streaky otherwise. (As I learned the hard way…)

With all the decorations you want on the outside of the tin, you now need to cover the outside with Mod Podge to seal it in and prevent any stains or moisture from discolouring the paper. Pay particular attention to any joins you have in the paper. I applied gentle pressure to the join for 30 secs and then hastily covered the join in Mod Podge. Use the paintbrush to hold it in place for a further 30 seconds to ensure it stays in place. On one of the tins I made, I used Vellum (transparent paper) which when paired with the Mod Podge created quite a corrugated effect. This worked with the look I was going for, so I wasn’t too concerned about the bubbling at the join you can see above.

Step four:

IMG_2315IMG_2313

Prepare the lid for your decorative covering by coating it with Mod Podge. Next you’ll need to pop on the paper circle you cut out earlier and any labels you want to put on the top. Once they are positioned correctly, apply Mod Podge over the top. Leave tin overnight to dry.

Step five:

IMG_2328IMG_2322

Pop a decorative ribbon around it and admire your handiwork!

Now all I need to do is cook the Chocolate Balls and place inside and my Christmas gifts for the year will be all sorted!

Scrap Maintenance

IMG_2333

This week I’ve been spending a LOT of time with my Big Shot Fabric Cutter. It is AWESOME! So awesome in fact that I’ve already broken about 3 of the moulds for cutting squares due to overuse… they last me for about 8,000 squares and then break. But with no other options except manual cutting, I’m pretty happy with those odds. The one above is pretty new which means it is cutting super accurately right now, which is good. If you use your cutter as much as I do you’ll notice that as the die gets worn it starts cutting the edges with an inward curve to them. It doesn’t make much difference as when sewn together it is hidden in the seam allowance, but it’s obviously preferable to have accurately cut squares!

Over the past few days I’ve been cutting through all my teeny tiny scraps that I somewhat optimistically saved, to make as many 1.5″ squares as I can. So far I’ve cut up about 400 and have worked through one shoebox chocked full of fabric scraps.

IMG_2332

When I started saving the scraps I had lofty ideas of a big quilt haphazardly sewn together to maximise each piece of fabric… but then when I was faced with the actual task – I realised what a silly idea that was! I’ve no doubt that it would have been possible but with the limited time I have for sewing these days and my relatively little amount of sewing prowess… I think I made a smart move abandoning that particular idea. In fact, I’m really happy with the result. I’ve decided to maintain my process of keeping tiny itty bitty scraps. Once I fill another shoebox I’ll assign a week to cut it down into 1.5″ or 2″ squares. It is a lot better looking at a pile of useable squares than a box overflowing with random wrinkled shapes, that’s for sure!

IMG_2331

What do you think? Do you save your tiny pieces of fabric and cut them down into squares? Even if you don’t actually use them you could easily sell these on Etsy or at local markets. There are so many people getting into Postage Stamp Quilts and needing tiny pieces of heaps of unique fabrics, I think it is a great, (if time-consuming) way to use up excess unwanted fabric. In any case, I’ll certainly be doing this for the foreseeable future. My tip? Chuck a movie on while you’re cutting the squares. It is rewarding seeing a pile grow but it is a tedious process, especially when there are such randomly shaped pieces of fabric to try to salvage a square from.

Upcycled Mouse DIY

IMG_1746

This week I was in the mood for trying something new so decided to try my hand at a cool pattern I’d come across online for a recycled menswear mouse. I picked up a box of menswear fabric samples at this cool place called Resource Rescue in Bayswater about 6 months ago and have been waiting for the ideal opportunity to put them to use – and this was it!

After rifling through the hundreds of samples at my disposal I came up with these three:

IMG_1728

If you want to make a mouse like this then you’ll need to download the template here. I personally found the instructions a little lacking and had a few frustrating moments in the creation of my mouse as a result. So I thought I’d re-write them for anyone else keen to have a go:

Step 1:

IMG_1725IMG_1729
Print the pattern pieces, and cut out. Using the pattern as a guide, cut out 1 bottom piece and 1 side piece from the same or different fabric. Flip pattern, and cut out another side piece. For a tail, cut a 1-by-4-inch strip on the bias. (mine has a bit of paper stuck on it – just ignore that!)

For ears, cut out four pieces of fabric using the pattern as a guide. Place two of the pieces back to back, right sides out and roughly sew a seam around the edges so they are tacked together. Repeat for the other ear. (The original pattern calls for using fusible webbing with the ears, but that is a bit much effort for me for a “quick” project like this.)

Step 2:

IMG_1730IMG_1731
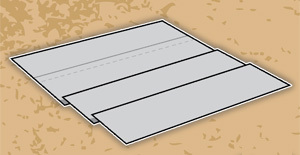
Next I sewed the body pieces to the bottom piece (right sides together) leaving a one-inch ish sized opening at the back of the mouse, ready for the tail and so that the mouse could be turned right sides out and stuffed. I don’t use pins for things this small and just guided the fabric with my fingers, pulling it into place as I went – but if you want to use pins that will also work.

Note that the bigger end of the  body pieces should be sewn to the wide end of the bottom piece – I made the mistake of originally sewing them together the opposite way – which did not work!

Step 3:

IMG_1733IMG_1734
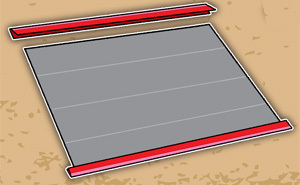
The original pattern calls for: “Fold tail in half lengthwise, right sides facing; stitch with a 1/4-inch seam allowance, leaving ends open. Turn tail right side out using loop turner.” But I tried this and my scrap menswear fabric was way too stiff for turning it back right side out was impossible. Instead, I ended up folding the tail fabric in half lengthwise, right sides on the outside and stitching haphazardly up and down until I was happy with how it looked.

Step 4:

IMG_1736IMG_1739

Turn body right side out, and stuff with fill. The fill I use is generally just the pieces of fabric so minutely small that they can serve no other purpose in my creative pursuits other than being upcycled stuffing for projects like this. I collect them as I cut out pieces for other projects. Once you mouse is stuffed to your desired firmness, insert the tail into opening and hand-stitch closed. Knot end of tail.

*FYI please excuse the horrendously awful handstitching on my mouse. I’ve never been big on handstitching and haven’t given it the attention that it really deserves considering how often I’m sewing and creating.

Step 5:

IMG_1740
Fold ears in half, and attach to body with small hand stitches. Mark placement of eyes with pins, and then embroider eyes and nose using backstitches.

**FYI I ran out of patience with handstitching and eventually decided that my mouse would have ears, but no eyes or nose. I’m tempted to draw them on with a sharpie but also kind of like the lack of detail. In any case, don’t feel as though mouth and eyes are mandatory – they aren’t.

Step 6:

IMG_1746
Admire your completed mouse!

You might have gathered by now that while I enjoyed making this mouse, it is definitely not something I want to experience making again! Way, way too much fiddly handsewing involved for my liking.

My problem now is that I’m still faced every day with this large box of mens suiting fabric samples:
IMG_1727

I have NO idea what to use them for now. Any ideas?

Plastic Bag, Bag

Hands down this is the absolute best thing I’ve made so far that has been made from recycled materials. I absolutely LOVE this bag that I made from old plastic bags I had saved from various shopping trips etc.

Aside from the cotton I used to sew it together – I didn’t have to buy a single thing! I really love the colours that I used in this bag – black, white and yellow plastic bags and a funky purple thread. The thread was actually an accident – a case of me forgetting I’d taken my token white thread out of the machine and once I’d started I realised how cool it looked and kept going. Sometimes mistakes make for the best creative streaks in a project. I certainly loved how this one turned out:

IMG_1390

The bag is really strong and sturdy – great for re-using and super simply to clean. I plan on using it for a beach bag in summer.

Want to make your own?

Step one:
Cut up about 6-10 plastic bags. Take off the handles and cut the bottoms so that you have individual sheets of plastic without any folds or creases in them.

Step two:
Lay out about 5 sheets of plastic on top of each other on your ironing board using some baking paper or freezer paper to protect the surface of the iron from the plastic (you don’t want the plastic melting onto your iron!) gently press the iron over the plastic with the aim of melting the individual layers of plastic together to form one solid layer of plastic material. I held the iron for about 5 seconds in one spot, then picked up the iron and plonked it down somewhere else for another 5 seconds and so on until you’ve covered the entire sheet area. Note: I also put baking paper underneath the plastic to protect my ironing board from extra hot, melting plastic. Repeat this process for the two biggest sides of your bag, the bottom and the sides.

*In regards to measurements – you can make these up as you go based on the measurements of the plastic bags you have on hand, or you can collect plastic bags of a certain size having figured out the measurements you prefer in advance.

*Depending on the type of bags you use, you will need different amounts of plastic layers to make each bit of plastic material to make your finished bag from. Eg. I had some really thick plastic bags so I only used 4 layers of plastic to make each plastic sheet. But another one I’ve made used the super thin and flimsy grocery/butchers plastic bags and they melted so quickly and easily that I needed a good 8 layers to ensure the iron didn’t melt a hole through the whole lot! I advise experimenting beforehand to gain an understanding of how various bags melt and how they melt together.

*Regarding design – there are some super creative plastic bags out there and I think it would look really awesome to melt some lolly/confectionary wrappers onto the surface of a bag. Don’t be afraid to get creative!

Step three:
Now that all your plastic has been fused together into singe layers it’s time to trim each piece to size and get sewing.

Step four:
Use your trims and offcuts from step three to create some groovy handles for your bag. Use a strong locking stitch to secure these to the top of your bag and you’re all done!

Enjoy!

Here’s some more pictures of my bag:

Dad’s Stache Father’s Day DIY

For Father’s Day last year I was seriously broke and wanted to give my Dad something both fun and useful that I knew he would like. After drawing a complete blank for a week I eventually stumbled upon a great tutorial online for a personalised lolly jar!

The idea was a winner and within a few hours I had crafted the perfect gift for my Dad.

Head here for the original tutorial I followed coupled with the free printable template.

The basic instructions are to strip back a tin or jar (I used a Milo tin), with whatever decorations you like that are relatively flat. I used some scrapbooking paper plus the free printable templates.

Once you’ve done that then you cover the paper areas with Mod Podge and allow to dry. This puts a clear seal over your paper – simultaneously holding it in place and keeping it clean. Leave it to dry overnight and that’s it!

Check it out! The idea is that you make the tin, and then keep it stocked full of your Dad’s favourite things for the rest of the year. Pretty cool present idea and best of all – my Dad loved it!

IMG_1421 IMG_1422

DIY Fabric String

A few months ago I posted about an awesome technique I found online to make your own string from teeny tiny fabric strings of 1″ wide or less. Well, after many hours in front of the TV twirling and knotting I’ve finally finished a whole reel of my own string from fabric scraps I’ve been collecting for ages.

In my last post I shared a video of a cool no-sew joining technique and I found that this worked on my strips of fabric that were at least 1″ wide. But for pieces smaller than that I had problems with the fabric ripping and breaking etc and ended up changing my method after about five minutes.

The way I did it was SUPER simple – I just tied a knot to join two pieces of fabric together and then would it on to the reel. And repeat. It took forever to make a whole reel but I carted my bag of scrap fabric along to babysitting gigs and friends houses and sat there joining my fabric together over many discussions in many different places! And now, I can finally show you!

IMG_1417

I used a lot of designer fabric strips and I’m so glad that I did because the pretty colours make it so much more tempting to use.

Now to decide what to use it for! Any ideas?

Upcycling from skirt to toy

This week I decided to do some upcycling! I have a whole bag of favourite pieces of clothing etc that I just love too much to throw away or donate just yet. Some of them are clothes I plan to adjust – eg. taking in a seam or making shorter, but most I’ve kept purely for the opportunity to try and upcycle them into something new. This skirt is the one I chose to work with today:

IMG_0237

First off I decided that I wanted to try to make a toy with it. I was very lazy with my attempt and simply drew a shape onto a piece of paper and used that for the template for the body. I utilised some fabric scraps from other projects along with some felt for my little monsters eyes, mouth and tooth.

This is what I ended up with:

IMG_1221

His arms are stuffed a bit too tight for my liking – I was aiming for soft and pliable but went a bit overboard as you can see… those arms are rigid! But overall I’m pretty happy with him. I doubt I could make the same again as I didn’t take any measurements – the arms and legs aren’t even a consistent size, I just judged by eye and cut away.

My favourite part about him are his ears because I just adore the fabric. I learnt that I don’t particularly enjoy stitching with stretchy fabric – this was the first time I’ve done so – and might have to find a few online tutorials so that I manage it better next time.

Here’s a close up:

IMG_1223

When it comes to upcycling – so far – I tend to prefer spontaneous crafting when I’m in a creative mood. I’m yet to break out a pattern and really focus on technique etc when I’m re-using something old. I’m sure this will change eventually but that’s the way I’ve been doing it so far.

Have you upcycled anything recently?

Paper Face Collage

Today’s craft dose is a bit more random than normal… I had a whole stack of paper magazines to recycle (way more than I could ever hope to use) and decided to see if I could make a face using skin care/eye makeup advertisements that are so repetitive in women’s fashion magazines. I used two magazines that had already had heaps of pages ripped out or cut up for other crafts and left the rest in a stack to give away on Gumtree.

There isn’t much to say about the process, I just cut random blobs out from various faces and then lay them together until a face emerged.

Here is the result:

IMG_0006

I was quite happy with the way it came out but realised I couldn’t do anything with it because I, rather stupidly, didn’t think to put paper down before laying it out on the carpet. Normally with something like this where there are so many tiny pieces and placing is critical for maintaining the image, I would have carefully weighted it down and painted it over with a clear resin to preserve it. But, not willing to risk ruining the carpet, I just took a heap of photos then swept it up and into the bin.

It was a fun activity and it only took about half an hour so it’s definitely something I might look into doing for wall art when Farris and I get our own home. There’s so many images you could create – not just faces – and I’m tempted to try to replicate a favourite photo or art piece.

I was particularly happy with the way the hair worked out framing her face, as well as the lips. They were particularly difficult but ended up being quite distinct. See below for a close up.

IMG_0005


Anyway that’s all I really got up to this week. Have you seen any awesome examples of paper collage? Or have you created something similar? I’d love to see so please share!