So it’s finally here – day one of the Ryan Gosling Quilt Along! Yesterday I spoke about the Feminist Ryan Gosling ‘Hey Girl’ memes which in part inspired this quilt along. Today I thought I’d share another couple with you. The ‘Hey Girl’ tag took off and started being used in all kinds of creative ways and I thought you might like these ones because they are craft & sewing themed!


But enough of the pretty pictures, on to the sewing!
Below you will find three things: a Quilt Pattern Key, a zoomed in Block and the Fabric Requirements. The Quilt Pattern Key is to help you keep track of your blocks each week and to make it easier when it comes to assembly. The Zoomed in Blocks are close ups of each block. It will tell you exactly how many squares you need for that block in particular. Assembling 4 blocks will give you a row. Obviously the Fabric Requirements are to let you know how much fabric you will need to complete the entire quilt. Since they are the most important, we will start with that:

The finished quilt measures 72 inches by 58 inches with these measurements.
The Quilt Pattern Key and Close Up Blocks will be posted each week in groups of four until it’s all finished. Eventually I’ll put the complete pattern into a handy PDF for you all to download and enjoy that way. But for now we will sew along week by week. You can work at whatever pace you like. Please do email me any photos of your progress as I’d love to share them with everyone during the quilt along. You can also choose whatever colour fabrics you would like to use. Using grayscale makes it easy to customise to a different colour scale so that’s why I made my one in grey. Anyone who was also involved in The Happy Zombie’s Ron Swanson Along will know that people made Ron’s in all different colours, and some had him in grayscale but gave the background a colour etc. It was so awesome seeing everyone’s unique take on the pattern and was lots of fun. If you haven’t already, I’d definitely recommend checking it out.
But before we get going there are a few more niggly things we should run through first:
1. You can print out the instructions on this page for your reference by the sewing machine. Just make sure you check your printer settings and make sure you do a print preview to ensure the face maps and zoomed in squares are fitting onto the page.
2. I’m not a very fussy seam folder – I have no set system for folding to one side or down the middle etc. I generally just work with the fabric – if it’s more inclined to fall one way then I’ll encourage it to do so with the iron.
3. This quilt along assumes a basic level of sewing knowledge. If you haven’t made a quilt before then I’d recommend doing a few google searches on quilting & patchwork basics as I won’t be running through those on here.
4. If you want to grab a button for your website or blog, here it is:

You can link it up to this address: http://wp.me/p4Dl0T-1m which will send people to the very first announcement of the swap with all the links to each weeks instructions.
5. This is a free pattern that has taken me MONTHS to put together including all the cool little buttons and icons you can see on the site. I’m thrilled to be sharing it with you for free but if you do use it or think it’s cool please link the button to your site or share it on social media so people know that you are participating.
6. I work full time and am house hunting and wedding planning at the moment (Excitement is an understatement!) but I will endeavour to answer every comment posted, so don’t be shy! It might take me 24 hours to get back to you, but I will get there.
7. Endless lists and copyright legal stuff is incredibly boring and detrimental to fun sewing times so let’s all just agree that it’s a fun pattern, we’ll go at our own pace and we will share photos and dramas along the way? Yes? Awesome! Let’s go!
We will be starting in with the top row of the quilt, which is the top of Gosling’s head and a lot of background space. Now you could look at this as a pretty boring row OR you could see the million options for customisation. I liked popping in colourful squares into these white spaces to make it more interesting, but you might like to change the background colour altogether. I also like putting swirly or hair-like squares in to represent actual hair. Have a good think before you get started about what you would like your finished Gosling to look like. Time spent in reconnaissance…

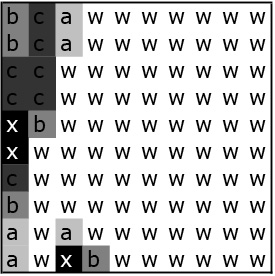
To make your life easier I’ve also made a Zoomed in version of each block for this week.
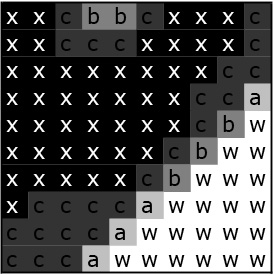
For Row 1, Column 1, you will need:
85 “W” shade squares
7 “C” shade squares
2 “B” shade squares
1 “A” shade square
5 “X” shade squares
(Remember to look at the Fabric Requirements chart above to see the shade values. You can use greys like I did or use the chart to select varying hues of another colour family.)
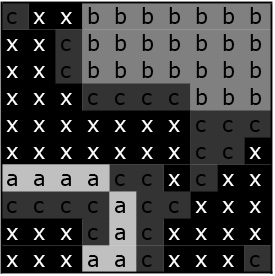
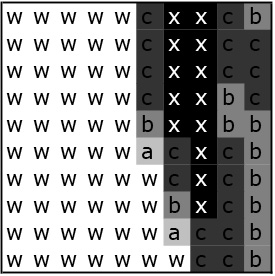
For Row 1, Column 2, you will need: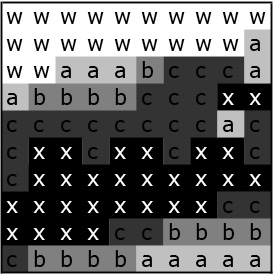
21 “W” shade squares
25 “C” shade squares
13 “B” shade squares
12 “A” shade square
29 “X” shade squares
(Don’t forget to put in some little highlight squares occasionally. Make sure the square generally matches the shade of the colour it’s representing, e.g. a black square with white dots would be a great one to use in place of one of the “X” squares.)
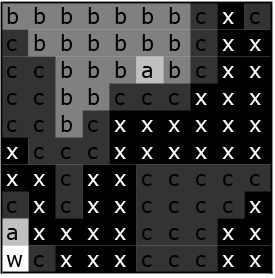
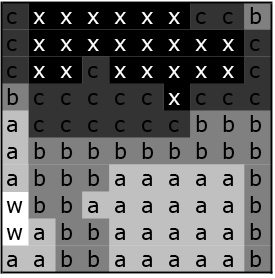
For Row 1, Column 3, you will need: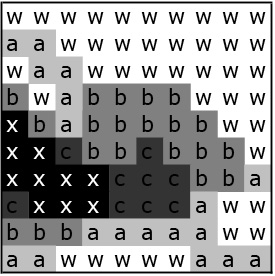
42 “W” shade squares
9 “C” shade squares
21 “B” shade squares
18 “A” shade square
10 “X” shade squares
Make sure to work slowly – it’s really easy to make a mistake with these blocks and not notice. And unpicking these takes a LONG time.
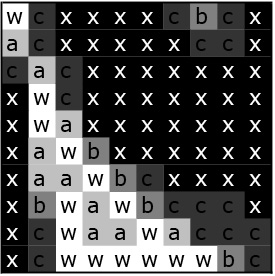
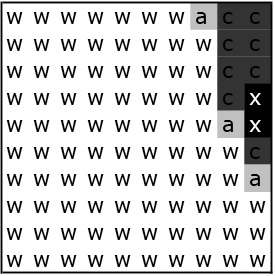
For Row 1, Column 4, you will need: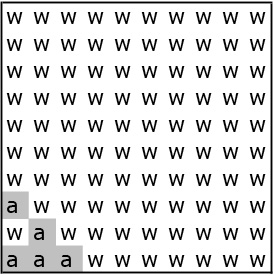
95 “W” shade squares
0 “C” shade squares
0 “B” shade squares
5 “A” shade square
0 “X” shade squares
Some people like to cut a slab of white fabric for blocks like this, rather than cutting out each individual square only to sew it back together again. There are two reasons why I don’t like doing it that way:
1. My maths is terrible and I ALWAYS end up making a mistake and having to awkwardly trim the square back to the right size.
2. I like the look of seeing each square individually sewn like the traditional pixel quilt. I think it looks so much more detailed and impressive and is worth the time and effort. Plus it allows you to pop in fun novelty squares very easily.
But at the end of the day, this is your quilt so if you would like to cut a big slab of white – go for it! Be sure to show me pictures so that I can see the alternative 🙂
Happy Sewing!

Here is my Ryan Gosling ‘hanging out’ at a local park in my area. Remember to email photos of your progress to barlow-jess@hotmail.com so we can all enjoy the Gosling Goodness and provide feedback and advice about colour choices etc. This is going to be really fun so stay tuned! Make sure to follow on Facebook too for daily updates and sharing of other sewers progress photos along the way.
Also, I’d really like to get my quilt in the same room as the real Ryan Gosling for a photograph… who knows, maybe we can make it happen….


 :
:


